Solving the First side of the Cube

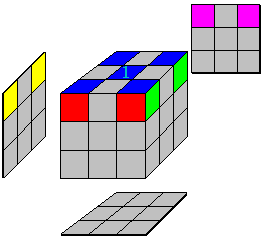
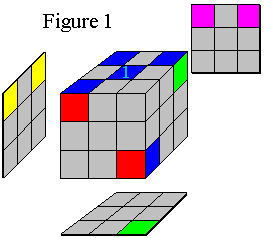
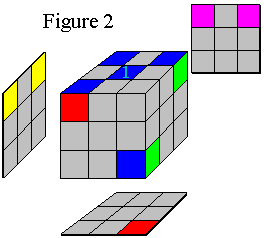
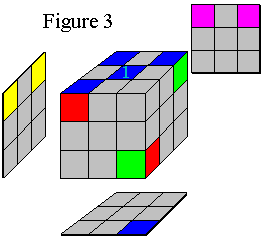
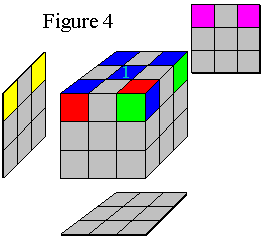
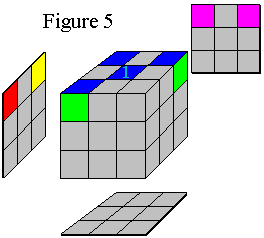
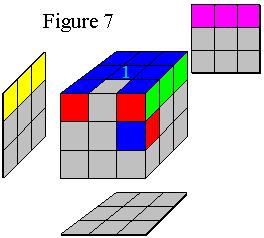
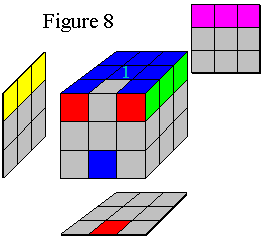
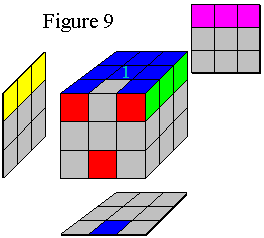
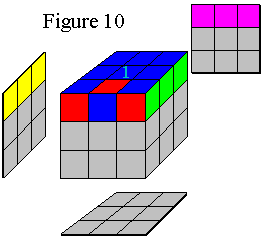
There are many ways to solve the first side of the cube, and this page demonstrates some of the techniques. The first step is to pick a color to be your first side (blue in the following figures). Next, move the four corner pieces containing a blue side into position, being sure that adjacent corner pieces have the same side color in addition to being blue. The moves and figures in Step 1 will help you accomplish this. Finally, fill in the gaps between the corner pieces with the appropriate edge pieces; Step 2 helps illustrate this.

Legend

  • U stands for the top (Upper) side,
  • D stands for the bottom (Down) side,
  • L stands for the left hand side,
  • R stands for the right hand side,
  • F stands for the front side,
  • H stands for the middle horizontal slice between the top and bottom sides. In the following figures it always contains the red, green, pink, and yellow middle-center pieces.

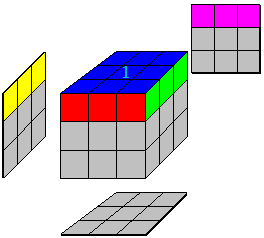
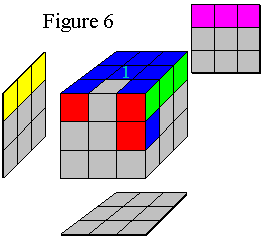
The numbers following each move describe which direction to rotate the side: 1 for one quarter turn clockwise, -1 for one quarter turn counterclockwise, and 2 for two quarter turns (half way around).

For horizontal slice H, look at the cube through the top (side 1) to determine the clockwise direction.


Step 1. Position the top corner pieces

Figure

The first step is to pick a color to be the first side. Orient the cube so the middle-center piece of this color is on top. Next, position the four corresponding corner pieces around the top, making sure that adjacent corner pieces have the same side color as shown in figure on the left.

To help you accomplish this, the following figures show various situations you may encounter while placing the corner pieces, along with moves to position the desired piece.

Figure 1

Figure 1 shows a corner piece in the bottom layer that needs to be inserted into the top layer. Set up the cube as shown in Figure 1 and use Move 1 to insert the piece.

Move 1: L-1 F-1 L

  • In words, rotate the left side one quarter turn counter-clockwise, then the front side 1/4 turn counter-clockwise, then the left side 1/4 turn clockwise.
  • If this notation is still confusing, click on Figure 1 to see example figures demonstrating the move.
Figure 2

Figure 2 shows a corner piece also along the bottom layer that needs to be inserted into the top layer. However, this time the blue color is facing forward. Set up the cube as shown in Figure 2 and use Move 2 to insert the piece.

Move 2: D-1 R-1 D R

Figure 3

Figure 3 shows a corner piece also along the bottom layer that needs to be inserted into the top layer. However, this time the blue color is facing downward. Set up the cube as shown in Figure 3 and use Move 3 to insert the piece.

Move 3: R-1 D R F D2 F-1

Figure 4

If the corner piece you need is already in position, but is not oriented correctly (as shown in Figure 4), then move it out using Move 4. Now use Move 1, 2, or 3 to re-insert it.

Move 4: R-1 D-1 R D

Figure 5

If the corner piece you need is located in the wrong location on the top layer (as shown in Figure 5), then move it out using Move 5. Now use Move 1, 2, or 3 to insert it.

Move 5: L D L-1

Step 2. Position the edge pieces between the top corners

Figure

Now that the top corners are in place, the edge pieces that belong between the corners can be positioned. You'll find the top side's edge pieces scattered about the cube. For each piece, determine where it goes, and place it there without disturbing the top.

To help you accomplish this, the following figures show various situations you may encounter while placing the edge pieces, along with moves to position the desired piece.

Figure 6

Figure 6 shows an edge piece on the side that needs to be placed in the top layer between the red-blue corner pieces. Set up the cube as shown in Figure 6 and use Move 6 to insert the piece.

Move 6: H-1 F H F-1

  • In words, rotate the middle horizontal slice toward the right (one quarter turn counter clockwise), then the front side clockwise one quarter turn, then the horizontal slice back toward the left (clockwise), and lastly the front side counter-clockwise.
  • If this notation is still confusing, click on Figure 6 to see example figures demonstrating the move.
Figure 7

Figure 7 also shows an edge piece on the side that needs to be placed in the top layer between the red-blue corner pieces. This time, the blue side of the edge piece faces forward. Set up the cube as shown in Figure 7 and use Move 7 to insert the piece.

Move 7: H2 F-1 H-1 F

Figure 8

In Figure 8 the desired piece is on the bottom, with the blue side facing forward. Set up the cube as shown in Figure 8 and use Move 8 to insert the piece.

Move 8: F-1 H F

Figure 9

In Figure 9 the desired piece is on the bottom, but the blue side is facing down. Set up the cube as shown in Figure 9 and use Move 9 to insert the piece.

Move 9: F-1 H-1 F2 H F-1

Figure 10

If the edge piece you need is already in position but is incorrectly oriented, or if it is located somewhere else in the top layer, then set up the cube as shown in Figure 10 and use Move 10 to remove the piece. Now, go back and use Move 6 or 7 to insert the piece.

Move 10: F H-1 F-1 H

Back to Step 1 Overview