DIRECTIONS FOR SOLVING THE SQUARE 1
|
|
|
|
|
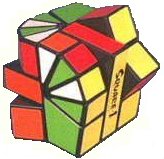
These instructions can be used to help you solve the Square 1, a fiendishly difficult puzzle introduced in 1992. These directions are a graphical version of those given by Andrew Arensburger and Christian Eggermont (C.Eggermont@inter.NL.net). Another useful Square 1 solution can be found at Jaap's Puzzle Page. I would appreciate any and all feedback or questions about the instructions; please see the end of this page for the e-mail address.
Purchasing Puzzles: If you are having troubles finding stores that sell cubes and similar puzzles, I have a list of on-line sites that may have what you're looking for.
My other cube pages
|
|
My directions for Solving the Rubik's Cube (3x3x3) - these also apply to the 2x2x2 |
|
|
See Denny's solution for solving the 3x3x3 cube. This is a more detailed solution for the 3x3 than the one I provide (mirrored from the now missing http://www.calormen.com/vpm/puzzlesolutions/rubikscube/) |

|
See Denny's solution for solving the 4x4x4 cube (mirrored from the now missing http://www.calormen.com/vpm/puzzlesolutions/revenge/) |
|
|
My directions for Solving the Pyramix (Pyramid) |
As a preview, the steps are:
|
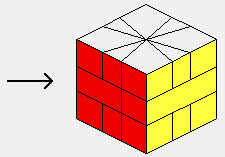
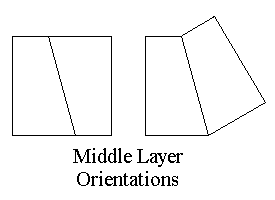
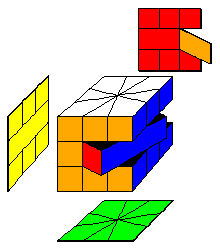
I will only show a 3D representation of the Square 1 when the top and bottom layers are truly square, as shown in the adjacent figure. The diagrams show all six sides of the cube by pretending that mirrors are being held up so that you may see the "hidden" sides. The orientation of the two pieces in the middle layer does not matter until the final step. Consequently, I will always show the middle layer as being square, even though it could be non-square at any time; simply ignore its configuration. All that matters is that you line up the middle layer such that the right half of the cube can be rotated when needed. Be aware that in Step 1, when describing how to return the Square 1 to a true cube from any shape, the figures do not use the "mirror" representation; rather, end on views are used. In that case the bottom view represents what you would see if you looked directly at the bottom. This is exactly opposite the way the "mirror" representation works. The primary moves available for the Square 1 are to turn the top, turn the bottom, and rotate along the central vertical axis (there is only one vertical axis since the middle layer only contains two pieces, as shown in the adjacent figure). Because each of the corners is essentially twice as wide as each of the edge pieces, the basic unit of rotation for the top and bottom is the width of an edge, or 30°. With this in mind, the following notation will be used:
|
|
|
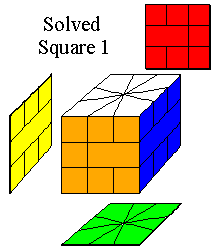
In order to instruct how far to turn the top or bottom, the letters t and b will be followed by a number indicating the number of "units" to turn the layer (1 unit = 30 degrees). Thus, t1 means to turn the top layer one unit (30°) clockwise looking at the layer; t-1 means to turn it 30° counterclockwise. Similarly, b3 means to turn the bottom 3 units (90°) clockwise, while looking at the bottom; b-2 means to turn the bottom 2 units (60°) counterclockwise. By convention, always hold the cube so that the yellow side of the middle layer with the words Square 1 is on the left. |
|
Before attempting to correctly place the corners and edges, the puzzle must be in the shape of a true cube. I don't have any clear, memorizable strategies about how to go about this, other than trial and error and getting a feel for the puzzle. However, I do have a handy-dandy (but quite large) table of all possible shapes the puzzle can have, along with step-by-step instructions to restore the cube shape. The table works well, but is probably not memorizable.
When you have returned the Square 1 to a cube shape, the middle layer may still be non-square. You should use Move 5 to correct this situation before going on.
• Step 2: Place the corners -- Part 1
At this point you can either continue solving the cube manually using the moves given below, or download the Square1.Exe program, written by John Coffey (john2001@hotmail.com). To use the Square1 program (unzip it first), you simply type in the location of the corners and edges of your cube, then follow its directions. I've had the best luck with it if I first hold the cube with the yellow side to the front and the words Square 1 upright. Now, begin with the front/top edge piece and type in the top layer order, clockwise around the top. For the bottom layer, start with the front/bottom edge piece and enter the pieces clockwise as you look at the bottom face. Of course, the problem with using a computer program to help you solve the cube is that you don't get the satisfaction of doing it yourself. Still, if you get completely frustrated with the following moves, the Square1.exe program should be able to help you solve the cube (though you may still need to use Move 5 after using the program.
The first task is to get all of the white corners on the top and all of the green corners on the bottom. You can ignore the edge pieces for now. The basic move for accomplishing this is of the form:
t1 R tM bN R t-1, where M and N are 0,3,6, or 9 (i.e. multiples of 90°).
This basic move can be abbreviated T(tM,bN) to save space, but I will show the entire move to increase clarity.
The corresponding move utilitizing the bottom pieces of the cube is:
b-1 R tM bN R b1
This move is abbreviated B(tM,bN).
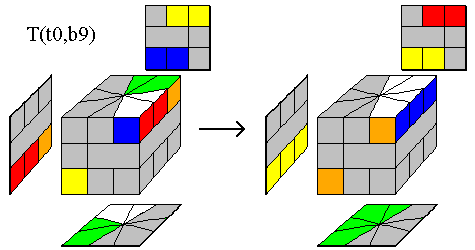
Below I have illustrated how the cube is affected when the T(tM,bN) move is applied with either M or N being 0. You should be able to use the moves shown to get all of the white corners on the top and all of the green corners on the bottom.
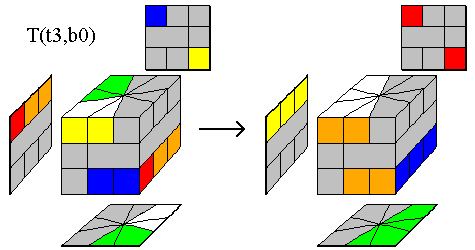
|
t1 R t3 b0 R t-1 |
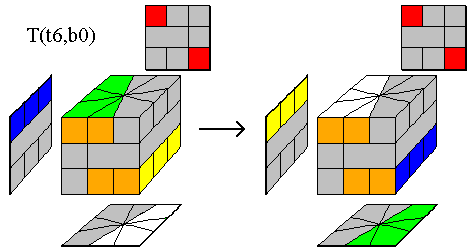
|
t1 R t6 b0 R t-1 |
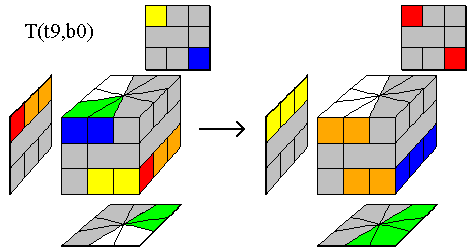
|
t1 R t9 b0 R t-1 |
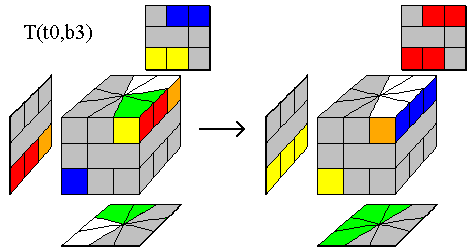
|
t1 R t0 b3 R t-1 |

|
t1 R t0 b6 R t-1 |
|
t1 R t0 b9 R t-1 |
|
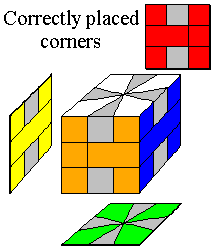
Step 2 -- Part 2 Once all the white corners are on the top and all the green corners are on the bottom, you need to place them in the correct location. This involves matching the edges of the corners up with the colors of the middle layer, to give a cube similar to the one at the right. Moves 2a, 2b, and 2c are useful for accomplishing the task of correctly placing the corners. Although a bit long, they are fairly repetitive. Move 2a works for the top corners and Moves 2b and 2c work for the bottom. |
|

|
|
|
Move 2a: T(t3,b0) b9 T(t3,b0) t9 T(t9,b3) t9 |
|
| In detail: |
t1 R t3 b0 R t-1 b9 t1 R t3 b0 R t-1 t9 t1 R t9 b3 R t-1 t9 |

|
|
|
Move 2b: T(t3,b0) b9 T(t9,b3) b9 T(t3,b0) t9 |
|
| In detail: |
t1 R t3 b0 R t-1 b9 t1 R t9 b3 R t-1 b9 t1 R t3 b0 R t-1 t9 |
|
|
|
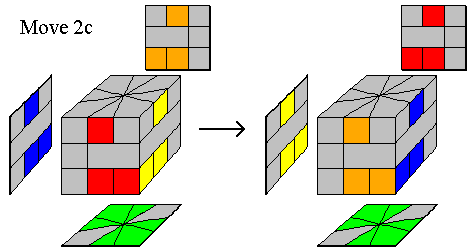
Move 2c: |
R t3 b3 R t-1 b-2 R t2 b2 R b6 R t-2 b-2 R t1 b2 R t-3 b-3 R |
Unfortunately, this last step can take the longest, especially if the edges are very scrambled. Furthermore, each of the moves listed below swaps 4 edges, not just 2. Because of this, a good strategy is to correctly place all four of the top edges, leaving yourself with two sets of bottom edges to be swapped. At this point do the following:
One hang-up with the Square 1 is that 50% of the time you will end up in the situation where just two edge pieces remain to be swapped -- this situation is known as a "parity" error and is discussed in Step 4 below. Also, if you would like ideas for additional moves that can be tried, please visit Jaap's Puzzle Page.
The following moves utilize both T(tM,bN) and the other conjugate move, B(tM,bN), defined as b-1 R tM bN R b1, where M and N are 0,3,6, or 9. I will still show the entire move to increase clarity. Notice that the T(tM,bN) conjugate move starts with t1, a clockwise rotation of the top, while B(tM,bN) starts with b-1, a counterclockwise rotation of the bottom. Do not let this confuse you.
|
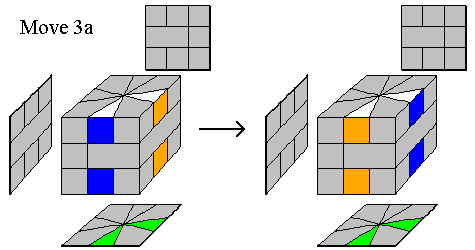
Swap adjacent edges on the top and adjacent edges on the bottom. |
|
Move 3a: t3 b6 B(t6,b0) b9 T(t6,b0) b6 B(t3,b0) t9 |
| In detail: |
t3 b6 b-1 R t6 R b1 b9 t1 R t6 R t-1 b6 b-1 R t3 R b1 t9 |
|
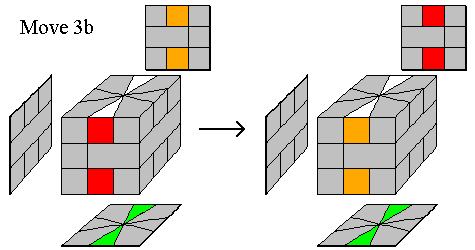
Swap opposite edges on the top and opposite edges on the bottom. |
| Move 3b: T(t6,b0) b6 B(t6,b0) b6 T(t6,b0) b6 |
| In detail: |
t1 R t6 R t-1 b6 b-1 R t6 R b1 b6 t1 R t6 R t-1 b6 |

|
Move opposite edges between the top and bottom. |
|
Move 3c: T(t0,b6) B(t0,b6) |
| In detail: |
t1 R t0 b6 R t-1 b-1 R t0 b6 R b1 |
|
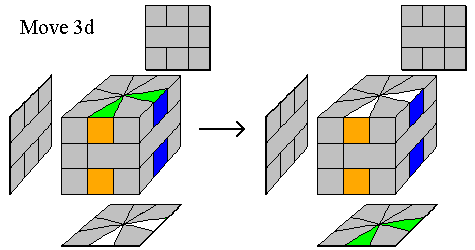
Move adjacent edges between the top and bottom. |
|
Move 3d: t3 b6 B(t6,b0) b3 T(t6,b0) b6 B(t9,b0) t9 |
| In detail: |
t3 b6 b-1 R t6 R b1 b3 t1 R t6 R t-1 b6 b-1 R t9 R b1 t9 |
|
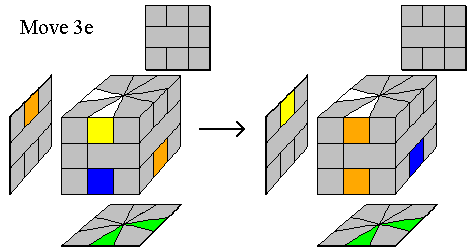
Swap adjacent edges on the top and adjacent edges on the bottom (non-parallel edges). |
|
Move 3e: B(t9,b0) b6 T(t6,b0) b3 B(t6,b0) b6 |
| In detail: |
b-1 R t9 R b1 b6 t1 R t6 R t-1 b3 b-1 R t6 R b1 b6 |
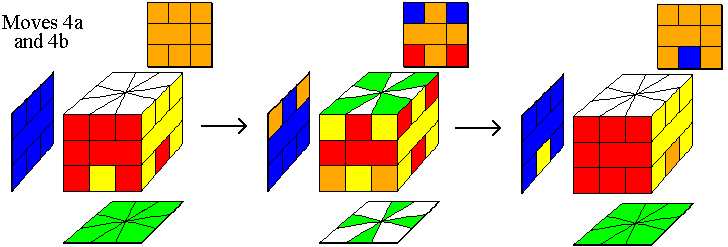
• Step 4: Fix a Parity Error (if needed)
If, while using the moves in Step 3, you find that you reach the situation where only two edge pieces remain to be swapped, then you have encountered a parity error. This occurs 50% of the time when solving the Square 1. Luckily, Courtney McFarren (and others) have developed a set of two moves to fix this situation. First use Move 4a, which puts the top corners on the bottom and the bottom corners on the top, then use Move 4b to fix the situation. The overall effect is that you have changed from having two edge pieces to swap (not possible) to now having three to swap (possible). The instructions in Step 3 can then be used to complete the cube.
|
|
| Move 4a: |
R t-3 b-3 R t-2 b-1 R t-2 b-2 R b-2 R t-2 b-2 R t-2 b-1 R t3 b3 R |
| Move 4b: |
b-1 R t-3 b-3 R b1 t1 R t-3 b-3 R t2 |
• Step 5: Fix the middle layer (if needed)
Once the top and bottom layers have been solved, you may end up with one piece of the middle layer needing to be "flipped". Move 5 can be used to fix this situation.
|
Move 5: R t6 R t6 R t6 Note: t6 = 180° |
I hope you have found these directions to be clear and complete, yet concise. If these directions help you to solve the Square 1, I would enjoy hearing from you.
Special thanks go to Andy Kaylor for the contribution of Move 2c, an improved version of Move 3b, and informing me of the availability of a move from Courtney McFarren to fix the "parity" problem.
Contact info: I appreciate receiving e-mails describing your success with these directions, but I cannot provide any additional help in solving the Square 1 beyond the instructions and steps shown here. Please also e-mail if you have problems accessing a page or seeing a graphic.

Last Modified May 19, 2013